
For many home bakers, salt bread recipe erins cozy kitchen has become a comforting staple worth mastering. It represents a soft, flavorful bread that balances simplicity with a deeply satisfying texture, making it ideal for everyday meals.
When exploring traditional comfort baking, many cooks turn to salt bread recipe erins cozy kitchen because it offers a dependable method that produces tender crumb, lightly crisp crust, and balanced seasoning without complicated techniques. It’s approachable for beginners yet refined enough for experienced bakers who care about structure, hydration, and fermentation timing.
This style of salt bread focuses on:
- A soft but structured interior
- Proper salt balance for flavor enhancement
- Controlled proofing for optimal rise
- A golden, lightly crisp exterior
Unlike overly dense breads or overly salty quick versions, this recipe emphasizes controlled yeast fermentation, allowing gluten to develop gradually for better elasticity and chew.
In this guide, you’ll learn:
- Core ingredients and why they matter
- Step by step preparation method
- Texture and flavor optimization tips
- Storage and freezing guidance
- Practical serving ideas
Understanding the Ingredients and Their Roles
A great salt bread starts with simple ingredients but understanding their function is what separates average bread from exceptional results. This version keeps the ingredient list minimal while focusing on balance and technique.
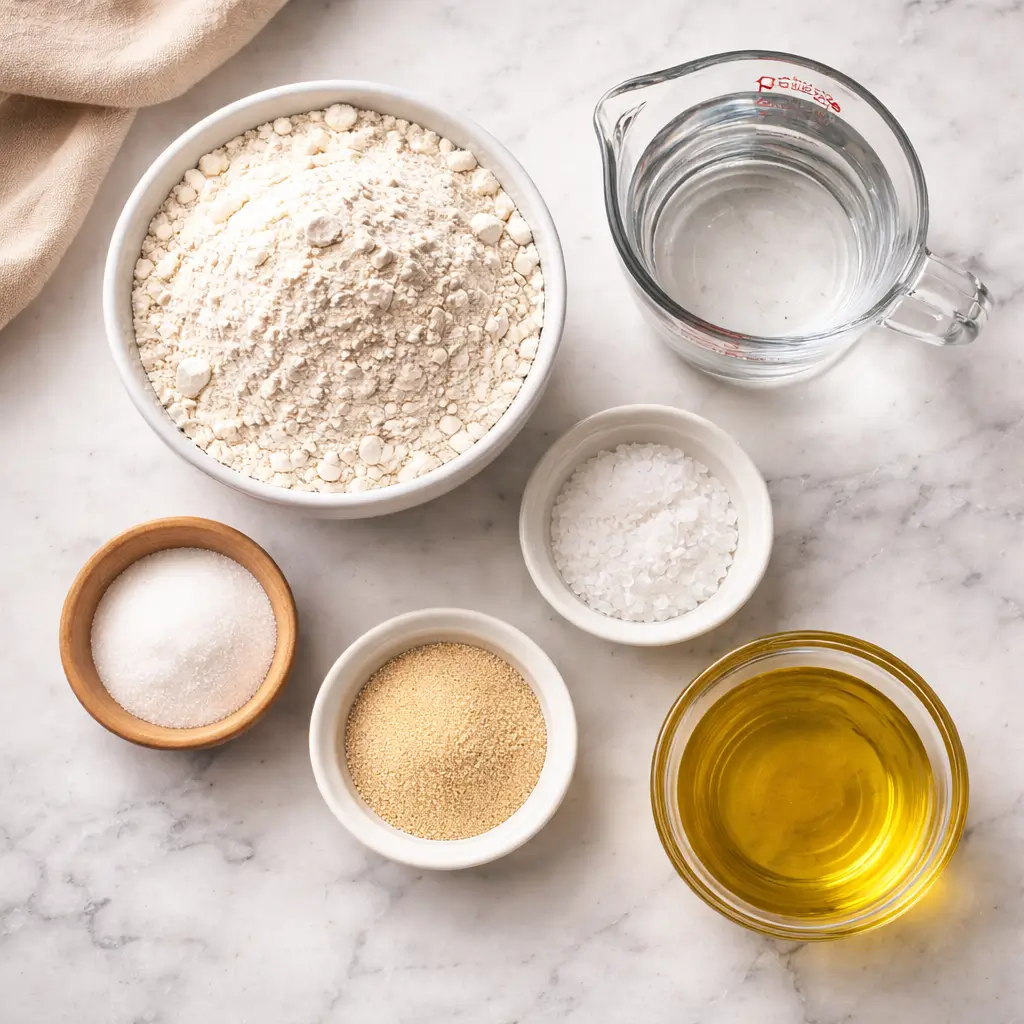
Here are the core ingredients used in this preparation:
- All purpose flour
- Warm water
- Active dry yeast
- Salt
- A small amount of sugar
- Olive oil or softened butter (optional, for tenderness)
Let’s break down why each one matters.
Flour forms the structural base. All purpose flour works well because it provides enough protein for gluten development without creating an overly chewy loaf. If you prefer slightly more structure, bread flour can be substituted.
Water activates yeast and hydrates flour. The temperature should be warm—not hot—to encourage fermentation without killing yeast.
Yeast is responsible for rise and air pockets. Proper activation ensures light, even texture.
Salt is more than seasoning. It strengthens gluten, regulates yeast activity, and enhances overall flavor depth.
Sugar feeds yeast during the early fermentation stage and supports browning.
Oil or butter adds softness and subtle richness but can be omitted for a leaner loaf.
Ingredient Ratio Table
| Ingredient | Purpose | Impact on Texture |
|---|---|---|
| Flour | Structure | Determines crumb strength |
| Water | Hydration | Controls softness |
| Yeast | Leavening | Creates rise and air pockets |
| Salt | Flavor & control | Enhances structure |
| Sugar | Fermentation boost | Improves browning |
| Oil/Butter | Tenderness | Softens crumb |
Understanding these roles will help you adjust hydration, salt level, and fermentation time confidently.Creamy Strawberry Apple Punch Recipe Made Simple
Step by Step Preparation Method
Making this bread is straightforward when you follow each stage carefully. Proper timing and dough handling are more important than complicated techniques.
Step 1: Activate the Yeast
In a bowl, combine warm water (about 105 to 110°F) with sugar. Sprinkle yeast over the surface and let it sit for 5 to 10 minutes until foamy. If it doesn’t foam, the yeast may be inactive.
Step 2: Mix the Dough
Add flour and salt to a large mixing bowl. Pour in the activated yeast mixture. Stir until a rough dough forms. If using olive oil or butter, add it during this stage.
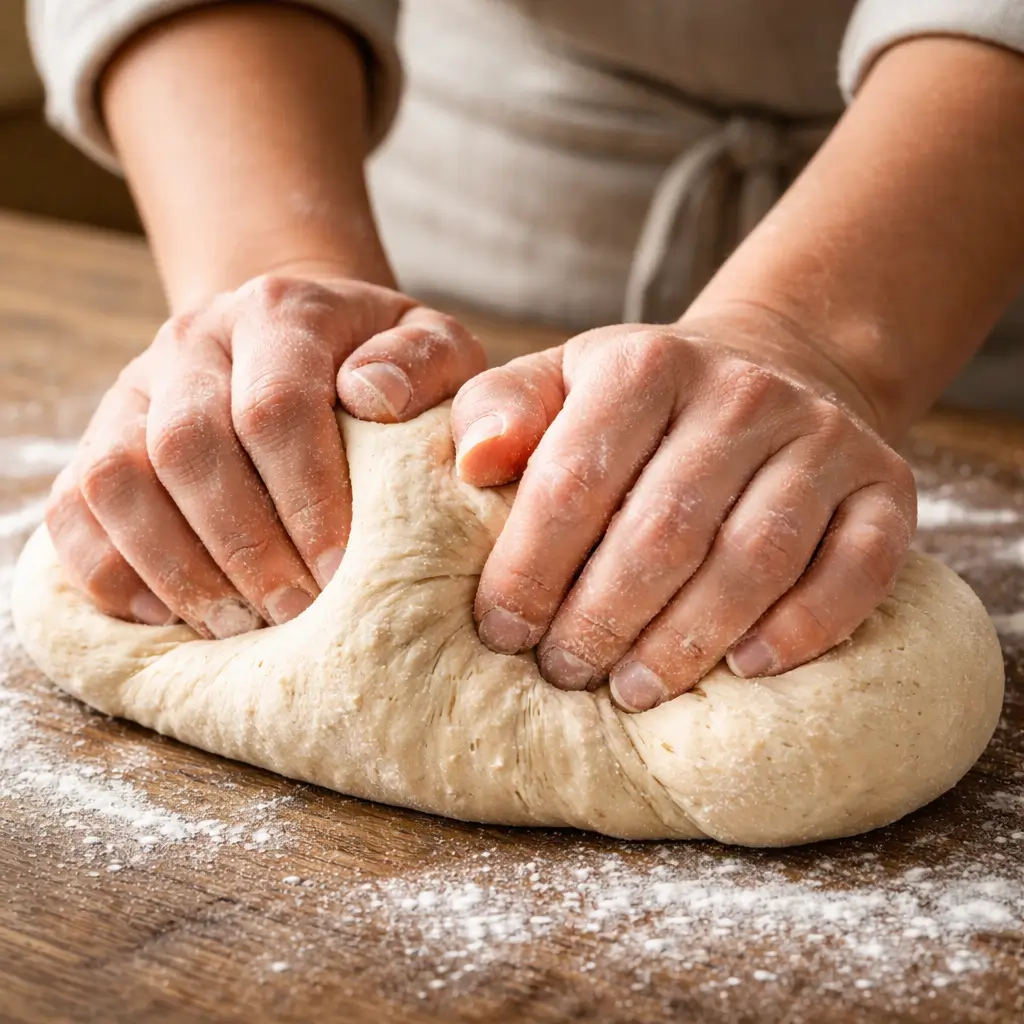
Step 3: Kneading
Knead the dough for 8 to 10 minutes by hand (or 5 to 6 minutes with a mixer). The dough should become smooth, elastic, and slightly tacky not sticky.
Step 4: First Rise (Bulk Fermentation)
Place the dough in a lightly oiled bowl. Cover and let it rise in a warm area for 60–90 minutes, or until doubled in size.
Step 5: Shaping
Gently deflate the dough and shape it into a round loaf or divide into smaller rolls.
Step 6: Second Rise
Allow the shaped dough to rest for 30 to 45 minutes until slightly puffed.
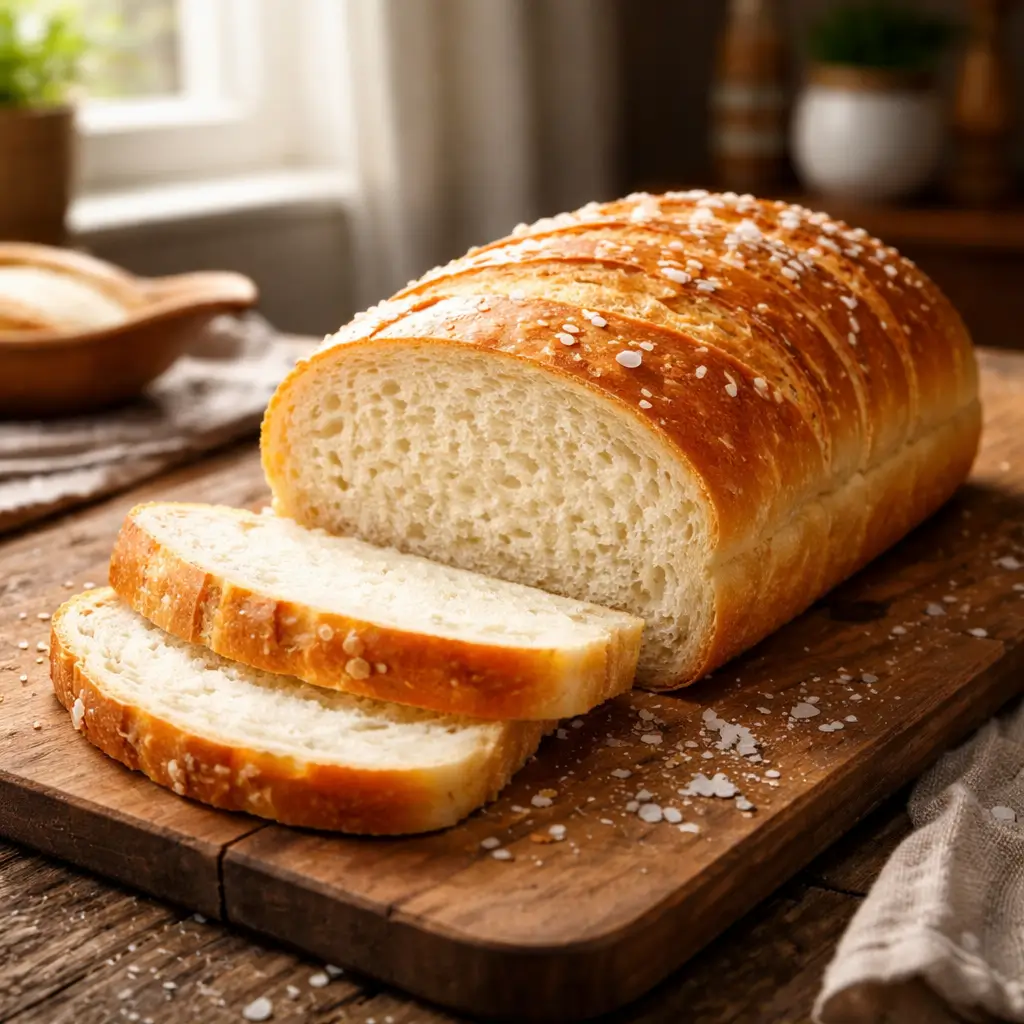
Step 7: Baking
Preheat oven to 375°F. Bake for 20 to 25 minutes (longer for larger loaves) until golden brown and hollow sounding when tapped.
Step 8: Cooling
Let the bread cool on a wire rack for at least 20 minutes before slicing to preserve texture.
Preparation Timeline Table
| Stage | Approximate Time | Purpose |
|---|---|---|
| Yeast activation | 5 to 10 minutes | Ensure fermentation |
| First rise | 60 to 90 minutes | Develop flavor & structure |
| Second rise | 30 to 45 minutes | Improve final texture |
| Baking | 20 to 25 minutes | Set crumb & crust |
Following these steps carefully ensures consistent results and balanced flavor.
Why Salt Bread Recipe Erins Cozy Kitchen Works So Well
One reason salt bread recipe erins cozy kitchen continues to gain attention is its balance between simplicity and reliability. The structure of salt bread recipe erins cozy kitchen focuses on proper hydration, steady fermentation, and controlled salt levels, which creates consistent results every time you bake it.
Unlike overly complicated artisan loaves, salt bread recipe erins cozy kitchen keeps the ingredient list short while maintaining flavor depth. The measured salt ratio in salt bread recipe erins cozy kitchen enhances gluten development without overpowering the bread. This is essential because salt does more than season it regulates yeast and strengthens dough structure.
Another strength of salt bread recipe erins cozy kitchen is its beginner friendly workflow. The mixing and kneading process in salt bread recipe erins cozy kitchen does not require advanced techniques like stretch and fold cycles or overnight cold fermentation. Yet, the final texture still feels soft, structured, and satisfying.
Consistency is key. When you follow salt bread recipe erins cozy kitchen step by step, you avoid dense centers, uneven crumb, or flat loaves. The timing built into salt bread recipe erins cozy kitchen ensures proper rise without over proofing.
Most importantly, salt bread recipe erins cozy kitchen delivers dependable flavor. The salt level enhances natural wheat notes rather than masking them, which is why many home bakers repeatedly return to salt bread recipe erins cozy kitchen as a trusted everyday bread method.
Texture Secrets for a Soft Yet Structured Crumb
Achieving the right texture is one of the most important parts of mastering this bread. A successful loaf should feel soft when pressed, slice cleanly, and hold its shape without crumbling. That balance depends on hydration, kneading, and fermentation control.
First, pay attention to hydration. The dough should feel slightly tacky but not sticky. If it sticks heavily to your hands, add flour gradually one tablespoon at a time. If it feels stiff and dry, add a small splash of warm water. Small adjustments make a big difference in final texture.
Second, kneading develops gluten. Under kneading can lead to dense bread, while over kneading may create a tight crumb. The dough is ready when it stretches thin without tearing easily (the “windowpane” test).
Third, fermentation timing matters. If the first rise is too short, the crumb may be compact. If it’s too long, the structure weakens. Aim for dough that doubles in size but still feels slightly elastic when gently pressed.
Texture Control Table
| Factor | Ideal Condition | Result |
|---|---|---|
| Hydration | Slightly tacky dough | Soft crumb |
| Kneading | Smooth & elastic | Good structure |
| First Rise | Doubled in size | Even air pockets |
| Baking Temp | 375°F | Golden crust |
Finally, cooling is critical. Cutting bread too soon releases steam, which can make the interior gummy. Allowing it to rest ensures the crumb sets properly.
Common Mistakes and How to Avoid Them
Even a simple bread recipe can go wrong if small details are overlooked. Understanding the most common mistakes helps ensure consistent results every time you bake.
Using Water That Is Too Hot
Water above 120°F can kill yeast instantly. Always use warm not hot water. If you cannot comfortably touch it, it is too hot.
Adding Too Much Flour
One of the most frequent issues is adding excess flour during kneading. This creates dry, dense bread. The dough should remain slightly tacky. Resist the urge to keep adding flour unless it is extremely sticky.
Skipping Proper Kneading
Insufficient kneading leads to weak gluten structure, resulting in flat or crumbly bread. Knead until smooth and elastic.
Over Proofing the Dough
If dough rises too long, it can collapse in the oven. Watch for doubling in size rather than relying strictly on time.
Cutting Bread Too Early
Slicing immediately after baking releases internal steam and can make the crumb gummy. Allow full cooling before cutting.
Mistake Prevention Table
| Mistake | What Happens | Prevention Tip |
|---|---|---|
| Hot water | Yeast dies | Use 105–110°F water |
| Too much flour | Dense crumb | Add flour gradually |
| Under kneading | Weak structure | Knead until elastic |
| Over proofing | Collapsed loaf | Bake once doubled |
| Early slicing | Gummy interior | Cool 20+ minutes |
By avoiding these common errors, you improve both texture and flavor consistency.
Flavor Development in Salt Bread Recipe Erins Cozy Kitchen
Flavor is where salt bread recipe erins cozy kitchen truly stands out. While many basic bread recipes focus only on rise and texture, salt bread recipe erins cozy kitchen pays attention to balanced seasoning and controlled fermentation. The measured salt level in salt bread recipe erins cozy kitchen enhances wheat flavor without overpowering the dough.
One reason salt bread recipe erins cozy kitchen produces reliable taste is its fermentation timing. During the first rise, natural yeast activity builds subtle depth. When prepared correctly, salt bread recipe erins cozy kitchen develops mild complexity rather than a flat flavor profile. This is why many home bakers prefer salt bread recipe erins cozy kitchen over quicker bread shortcuts.
Another factor that improves salt bread recipe erins cozy kitchen is even salt distribution. Salt must be mixed thoroughly into the flour before full hydration. Proper mixing ensures that salt bread recipe erins cozy kitchen has consistent flavor in every slice.
Resting time also impacts taste. Allowing salt bread recipe erins cozy kitchen to cool fully after baking preserves internal moisture and prevents flavor loss from excess steam release. Rushing this step can affect both texture and taste.
Ultimately, salt bread recipe erins cozy kitchen works because it balances salt, yeast, and fermentation timing. When followed carefully, salt bread recipe erins cozy kitchen delivers dependable flavor that feels simple yet satisfying.
Serving Ideas for Salt Bread Recipe Erins Cozy Kitchen
One of the reasons salt bread recipe erins cozy kitchen remains popular is its versatility. Freshly baked salt bread recipe erins cozy kitchen can be served warm with butter for a simple side dish, or sliced and used for sandwiches. The balanced seasoning in salt bread recipe erins cozy kitchen makes it suitable for both savory and lightly sweet toppings.
For breakfast, salt bread recipe erins cozy kitchen pairs well with scrambled eggs, avocado, or fruit preserves. Light toasting enhances the crust while keeping the interior soft. Many people use salt bread recipe erins cozy kitchen as a base for open faced sandwiches because its crumb holds toppings without becoming soggy.
At lunch, salt bread recipe erins cozy kitchen works well for deli style sandwiches. The structure of salt bread recipe erins cozy kitchen supports sliced meats, cheeses, and vegetables without crumbling. It can also be cubed and toasted to make homemade croutons.
For dinner, salt bread recipe erins cozy kitchen complements soups, roasted vegetables, and pasta dishes. The mild salt level in salt bread recipe erins cozy kitchen enhances main courses rather than competing with them.
Because salt bread recipe erins cozy kitchen has balanced flavor and soft texture, it adapts easily to many meals, making it a reliable everyday bread choice.
How to Store and Keep It Fresh
Proper storage is essential to maintain the soft texture and balanced flavor of your bread. Because this is a yeast based loaf without preservatives, it is best enjoyed fresh but it can be stored correctly to extend its quality.
Room Temperature Storage
After the bread has cooled completely, wrap it tightly in plastic wrap or place it in an airtight container. Store at room temperature for up to 2 to 3 days. Avoid refrigeration, as this can dry out the crumb and accelerate staling.
Freezing for Longer Storage
If you plan to keep it longer, freezing is the best option. Slice the bread before freezing for easier portioning. Wrap slices individually in plastic wrap and place them in a freezer safe bag. It can be frozen for up to 2 months.
Reheating Tips
To refresh frozen slices, thaw at room temperature and warm in a toaster or oven at 300°F for 5 to 7 minutes. This restores softness while lightly crisping the crust.
Storage Guide Table
| Storage Method | Duration | Best Practice |
|---|---|---|
| Room Temperature | 2 to 3 days | Airtight container |
| Freezer | Up to 2 months | Slice before freezing |
| Reheating | 5 to 7 minutes | Warm at 300°F |
Storing the bread properly ensures it retains moisture and flavor without becoming dry or stale.
Can You Make It Ahead of Time?
Planning ahead is helpful when baking bread, especially for gatherings or weekly meal prep. The good news is that this salt bread can be prepared in stages without sacrificing quality.
Preparing the Dough in Advance
You can mix and knead the dough, then refrigerate it during the first rise. After placing the dough in a lightly oiled bowl, cover it tightly and refrigerate for up to 24 hours. Slow fermentation in the refrigerator can even improve flavor development.
When ready to bake, remove the dough and allow it to come to room temperature for about 30 to 45 minutes before shaping.
Shaping Ahead
You may also shape the loaf or rolls and refrigerate them for the second rise. Cover loosely and refrigerate for up to 12 hours. Let the dough sit at room temperature until slightly puffed before baking.
Freezing Unbaked Dough
Freezing shaped, unbaked dough is possible, but texture may be slightly affected. If freezing, allow the dough to thaw fully and complete its rise before baking.
Make Ahead Options Table
| Method | Maximum Time | Flavor Impact |
|---|---|---|
| Refrigerated first rise | 24 hours | Improves depth |
| Refrigerated second rise | 12 hours | Maintains structure |
| Freezing dough | 1 month | Slight texture change |
Making it ahead allows flexibility while preserving texture and flavor when handled properly.
Nutritional Overview and Portion Control
Understanding the nutritional profile of homemade bread helps you make balanced serving choices. While exact values vary depending on ingredient quantities and portion size, a standard slice of this salt bread offers moderate calories with minimal added fat.
Estimated Nutrition Per Slice (based on 12 slices per loaf):
| Nutrient | Approximate Amount |
|---|---|
| Calories | 140 to 160 kcal |
| Carbohydrates | 28 to 30 g |
| Protein | 4 to 5 g |
| Fat | 1 to 3 g |
| Sodium | 180 to 220 mg |
Carbohydrates provide energy, while protein comes mainly from flour. The sodium level depends on the salt measurement used, so accurate measuring is important.
If you are monitoring sodium intake, you can slightly reduce salt but avoid cutting too much, as salt supports both flavor and gluten structure.
For balanced meals, pair one or two slices with protein rich foods such as eggs, lean meats, or legumes. Combining bread with fiber rich vegetables also helps maintain steady energy levels.
Homemade bread gives you ingredient control, which makes it easier to adjust portion size and nutritional balance according to your needs.
Frequently Asked Questions About Preparation and Storage
This section addresses common practical questions home bakers often have when making this bread.
Can it be made ahead?
Yes. You can refrigerate the dough during the first rise for up to 24 hours. This slow fermentation can slightly enhance flavor while maintaining structure. Allow the dough to return to room temperature before shaping and baking.
How should it be stored?
After cooling completely, store the bread in an airtight container or tightly wrapped at room temperature for up to 3 days. Avoid refrigeration because it accelerates staling and dries the crumb.
Can it be frozen?
Yes. Slice the bread before freezing for convenience. Wrap slices individually and store in a freezer safe bag for up to 2 months. Thaw at room temperature and warm briefly in the oven or toaster before serving.
Why is my bread dense?
Dense texture usually results from under kneading, adding too much flour, or insufficient rising time. Make sure the dough doubles in size during the first rise and feels elastic before baking.
Why is the crust too hard?
Overbaking or too high oven temperature can create an overly firm crust. Bake at 375°F and remove once golden brown.
Final Thoughts on Mastering This Salt Bread
Mastering this bread comes down to understanding balance. The ingredient list is simple, yet each component plays a crucial role in structure, flavor, and texture. Paying attention to hydration, kneading technique, and fermentation timing ensures consistent results.
This recipe is designed to be approachable while still delivering dependable quality. It does not require specialized equipment or advanced baking knowledge. With careful measurement and patience during rising, even beginners can produce a soft interior and lightly golden crust.
Consistency improves with practice. The more you bake, the better you’ll recognize proper dough texture and readiness for baking. Small adjustments like slightly extending the first rise or refining shaping technique can noticeably improve the final loaf.
Because this bread adapts well to many meals, it works as an everyday option rather than a special occasion recipe. When prepared correctly, it offers balanced flavor, reliable structure, and practical versatility for breakfast, lunch, or dinner.
Frequently Asked Questions
What makes this salt bread different from regular white bread?
This bread focuses on a slightly higher salt balance and controlled fermentation timing, which enhances overall flavor without overpowering the loaf.
Unlike some basic white bread recipes, the salt measurement is carefully proportioned to strengthen gluten structure while regulating yeast activity. The result is a soft interior with better elasticity and a more defined taste profile. It remains simple in ingredients but delivers improved consistency and balanced seasoning compared to standard quick white bread methods.
Can beginners successfully make this recipe?
Yes. The steps are straightforward and require only basic baking tools. As long as the yeast is properly activated and the dough is kneaded until smooth and elastic, beginners can achieve reliable results. Paying attention to dough texture rather than strictly watching the clock is important. Allowing the dough to double in size during the first rise and avoiding excess flour are key factors for success.
Can the dough be refrigerated overnight?
Yes. Refrigerating the dough during the first rise for up to 24 hours is possible and may even improve flavor depth. The slower fermentation allows more subtle complexity to develop. Before shaping, allow the dough to return to room temperature so it becomes easier to handle and completes its rise properly. Avoid refrigerating for longer than recommended to prevent over fermentation.
How should the bread be stored after baking?
Once completely cooled, store the bread in an airtight container or tightly wrapped at room temperature for up to three days. Avoid refrigeration because it accelerates moisture loss and makes the crumb dry. If you need longer storage, slicing and freezing the bread is the best option. Proper wrapping prevents freezer burn and helps preserve texture.
Can this bread be frozen successfully?
Yes. For best results, slice the bread before freezing so individual portions can be thawed easily. Wrap slices securely in plastic wrap and place them in a freezer safe bag. The bread can remain frozen for up to two months. When ready to use, thaw at room temperature and warm briefly in an oven or toaster to refresh the texture.
Practical Baking Checklist for Consistent Results
Before starting, reviewing a simple checklist can help ensure your bread turns out as expected. Small preparation steps often prevent common issues.
Pre Baking Checklist
- Measure flour accurately using the spoon and level method
- Confirm yeast is active and not expired
- Use warm water between 105 110°F
- Mix salt evenly into flour before full hydration
- Preheat oven fully before baking
During Preparation
- Knead until dough feels smooth and elastic
- Allow the dough to double in size during the first rise
- Avoid over flouring while shaping
- Check that shaped dough feels slightly puffy before baking
After Baking
- Confirm golden brown crust
- Tap bottom of loaf it should sound hollow
- Cool on a wire rack for at least 20 minutes
- Slice only after steam has settled
Following this checklist reduces uncertainty and improves consistency. Bread baking becomes easier when each stage is approached with attention to detail rather than rushing the process.
Why Home Bakers Keep Choosing Salt Bread Recipe Erins Cozy Kitchen
Many home bakers return repeatedly to salt bread recipe erins cozy kitchen because it delivers consistent structure without unnecessary complexity. The method behind salt bread recipe erins cozy kitchen focuses on controlled fermentation, balanced seasoning, and proper kneading, which reduces the risk of failure. When preparing salt bread recipe erins cozy kitchen, bakers appreciate that the steps are clear and manageable.
Another reason salt bread recipe erins cozy kitchen remains popular is reliability. Each time salt bread recipe erins cozy kitchen is followed carefully, the result is a soft crumb and lightly golden crust. The predictable outcome of salt bread recipe erins cozy kitchen makes it suitable for weekly baking routines.
Texture also plays an important role. Because salt bread recipe erins cozy kitchen emphasizes proper hydration and rise time, the finished loaf maintains elasticity without becoming dense. Many bakers note that salt bread recipe erins cozy kitchen performs well for sandwiches, side dishes, and simple buttered slices.
Finally, simplicity supports repeat success. With minimal ingredients and straightforward timing, salt bread recipe erins cozy kitchen offers a dependable approach to homemade bread. By following salt bread recipe erins cozy kitchen step by step, home bakers can confidently produce consistent, balanced results.
Conclusion
Salt bread recipe erins cozy kitchen remains a dependable choice for home bakers who value clarity, balance, and consistent texture. By focusing on simple ingredients and proper technique, this method produces a loaf with soft crumb and lightly golden crust.
Careful yeast activation, measured salt levels, and full fermentation time all contribute to structure and flavor development. Avoiding excess flour and allowing adequate cooling further protect the final texture.
This approach does not rely on complicated tools or advanced baking skills, making it accessible while still delivering reliable results. The bread adapts easily to breakfast spreads, sandwiches, and dinner pairings without overpowering other flavors. When stored correctly or frozen in slices, it maintains freshness for practical everyday use.
With repeated practice, small improvements in shaping and timing will refine consistency even more. Following each step thoughtfully ensures a balanced loaf that fits naturally into regular cooking routines and supports confident home baking.
FAQ
1. Can salt bread recipe erins cozy kitchen be made ahead of time?
Yes, the dough can be prepared in advance. After kneading, you may refrigerate it during the first rise for up to 24 hours. This slow fermentation can enhance flavor depth while maintaining structure. When ready to continue, allow the dough to return to room temperature before shaping. You can also shape the dough and refrigerate it for the second rise overnight. Just ensure it becomes slightly puffy before baking to achieve proper oven spring and texture.
2. How should salt bread recipe erins cozy kitchen be stored?
After baking, let the bread cool completely before storage. Wrap it tightly in plastic wrap or keep it in an airtight container at room temperature for up to three days. Refrigeration is not recommended because it accelerates staling and dries the crumb. If you need longer storage, freezing is a better option. Proper wrapping prevents moisture loss and helps preserve the bread’s soft interior and balanced flavor.
3. Can salt bread recipe erins cozy kitchen be frozen?
Yes, freezing works well. For best results, slice the loaf before freezing so you can remove portions as needed. Wrap slices individually and place them in a freezer safe bag. The bread can be frozen for up to two months. To serve, thaw at room temperature and warm briefly in an oven or toaster. This helps restore texture and lightly refresh the crust without over drying the crumb.
4. Why does my bread turn out dense?
Dense bread usually results from under kneading, adding too much flour, or insufficient rising time. The dough should feel elastic and slightly tacky before the first rise. It must double in size to develop proper air pockets. Measuring flour carefully and avoiding excess during shaping are important steps. Ensuring yeast is active and using water at the correct temperature also support better structure and a lighter crumb.
5. What makes this version unique?
This version emphasizes balanced salt measurement and controlled fermentation. Rather than relying on shortcuts, it uses proper kneading and proofing to create dependable structure. The salt enhances flavor while strengthening gluten, which improves overall texture. Its simplicity makes it approachable, yet the careful timing ensures consistent results. The bread’s versatility for meals throughout the day also contributes to its popularity among home bakers.
Follow Us Facebook
salt bread recipe erins cozy kitchen
Ingredients
Equipment
Method
- Combine warm water and sugar in a bowl. Sprinkle yeast over top and let sit 5–10 minutes until foamy.
- In a large bowl, mix flour and salt evenly.
- Add yeast mixture and olive oil to flour. Stir until a rough dough forms.
- Knead 8–10 minutes until smooth and elastic.
- Place in lightly oiled bowl, cover, and let rise 60–90 minutes until doubled.
- Shape into a loaf and let rise 30–45 minutes
- Bake at 375°F for 20–25 minutes until golden brown.
- Cool on wire rack at least 20 minutes before slicing
Notes
- Yeast Activation Matters: If the yeast does not foam after 5 to 10 minutes in warm water, discard it and start again. Inactive yeast will result in dense bread.
- Measure Flour Correctly: Use the spoon and level method instead of scooping directly from the bag. Too much flour can create a dry, heavy loaf.
- Dough Texture Check: The dough should feel slightly tacky but not sticky. If it sticks heavily to your hands, add flour gradually one tablespoon at a time.
- Proofing Environment: If your kitchen is cool, place the covered dough inside an oven with the light on to maintain a gentle warm environment for rising.
- Do Not Rush Cooling: Allow the bread to cool at least 20 minutes before slicing. Cutting too early can make the interior gummy.
- Freezing Tip: Slice before freezing for easier portion control. Reheat at 300°F for 5 to 7 minutes to refresh texture.